
Handling large volumes of data can be challenging, especially when businesses need to efficiently extract, transform, and load (ETL) data for analysis. This is where AWS Glue Studio proves invaluable. A fully managed ETL service by Amazon Web Services (AWS), it simplifies collecting, cleaning, and organizing data, making it readily available for analytics and data science applications.
With 90% of the world’s data generated in the past two years, organizations require tools that organize complex data workflows. AWS Glue Studio provides an intuitive visual interface that enables users to create and manage ETL jobs without extensive coding knowledge. Whether a data engineer or a business professional, this tool allows you to automate data transformation while easily integrating with other AWS services.
Beyond its ease of use, AWS Glue offers a range of essential services. The AWS Glue Data Catalog helps organize metadata, making discovering and managing datasets easier. AWS Glue ETL Jobs automate the data preparation process, while AWS Glue Crawlers scan and classify data structures. These capabilities ensure businesses can process data efficiently and gain actionable insights without manual intervention.
If you’re wondering about AWS Glue Studio, how to get started, or how to set it up, this guide will walk you through everything from installation to running your first ETL job. Let’s dive in and explore how AWS Glue Studio can simplify your data transformation journey.
What is AWS Glue Studio?
AWS Glue Studio is a visual tool within AWS Glue that simplifies the process of creating, managing, and running ETL (Extract, Transform, Load) jobs. It provides a drag-and-drop interface, allowing users to build data pipelines without extensive coding expertise. This makes it a game-changer for businesses that want to automate their data transformation and integration workflows efficiently.
At its core, AWS Glue Studio helps users extract data from various sources, apply advanced data transformation techniques to structure and enrich it, and then load it into a destination such as Amazon S3, Amazon Redshift, or other data warehouses. This ensures that raw data is cleaned, organized, and optimized for analytics or machine learning applications.
One of the key advantages of AWS Glue Studio is its ability to integrate with other AWS services easily. Businesses that rely on real-time analytics and cloud-based storage solutions find AWS Glue Studio particularly useful in reducing manual efforts and accelerating data-driven decision-making.
Key Capabilities of AWS Glue Studio
AWS Glue Studio is designed to simplify the ETL process by offering powerful capabilities that help businesses efficiently manage and transform their data. These include the AWS Glue Data Catalog, ETL Jobs, Data Crawlers, and Glue Studio’s visual interface. Each component is crucial in automating data workflows and ensuring organizations can extract valuable insights from their data with minimal effort.
1. Data Catalog – Centralized Metadata Management
The AWS Glue Data Catalog is a centralized metadata repository that stores critical information about datasets, including schema structure, format, and location. It ensures that different AWS services, such as Amazon Athena, Redshift, and S3, can access and use data efficiently.
According to recent reports, 80% of an analyst’s time is spent searching for and preparing data before they can use it for decision-making. Businesses can use the AWS Glue Data Catalog to eliminate redundant data management tasks and improve efficiency. If you’re wondering how to get AWS Glue Studio and connect it with other AWS services, setting up the Data Catalog is one of the first steps in the process.
2. ETL Job – Automating Data Transformation
An ETL Job in AWS Glue Studio automates fetching (extracting) data from various sources, applying necessary transformations, and loading the processed data into a designated storage location. This streamlined approach ensures efficient ETL data transformation, enabling businesses to prepare and structure data quickly for downstream analytics.
AWS Glue supports multiple sources, such as Amazon S3, RDS, and Redshift, making it easier to move and structure data for analytics. In traditional data workflows, ETL processes require complex scripting and manual intervention, leading to higher operational costs. AWS Glue Studio, however, allows users to build ETL jobs visually, reducing dependency on developers.
3. Data Crawler – Automating Schema Detection
A Data Crawler in AWS Glue scans datasets, detects their schema, and automatically populates the AWS Glue Data Catalog with relevant metadata. This means that users don’t have to manually define data structures, a common bottleneck in large-scale data processing.
AWS Glue Crawlers simplify making data usable for businesses dealing with unstructured or semi-structured data, such as log files or IoT sensor data. If you’re starting with AWS Glue Studio, running a Data Crawler is key to ensuring your datasets are well-organized and accessible.
4. Glue Studio – Simplified ETL with a Visual Interface
One of the standout features of AWS Glue is Glue Studio, which allows users to create ETL jobs using a drag-and-drop interface or through Python/Scala scripting. This flexibility enables both technical and non-technical users to build data pipelines effortlessly.
For businesses new to cloud-based ETL, AWS Glue Studio eliminates the steep learning curve associated with traditional ETL tools while also supporting modern workflows that combine ETL and ELT approaches for greater efficiency.
Setting Up AWS Glue Studio
Before using AWS Glue Studio to create and manage ETL jobs, you must ensure your AWS environment is configured correctly. Setting up AWS Glue Studio requires an AWS account, appropriate IAM roles, and AWS Glue permissions. Once these prerequisites are met, you can easily access the AWS Glue Studio dashboard and begin building data workflows.
Prerequisites for AWS Glue Studio Setup
To get started with AWS Glue Studio, you need the following:
- AWS Account – If you don’t have one, you can create a free account on the AWS website.
- IAM Roles and Permissions: AWS Glue requires specific permissions to interact with other AWS services, such as S3, RDS, and Redshift.
- AWS Glue Permissions – Ensure that your IAM role includes policies such as:
- AWSGlueServiceRole (allows AWS Glue to run jobs and access data)
- AmazonS3FullAccess (grants access to S3 for storing processed data)
- AmazonEC2ContainerRegistryReadOnly (enables AWS Glue to retrieve necessary resources)
Properly configuring IAM roles allows AWS Glue Studio to access and transform your data securely. A study by Gartner indicates that organizations with well-managed IAM policies reduce cloud security risks by over 70%, highlighting the importance of setting up permissions correctly.
How to Access AWS Glue Studio?
Once you have the necessary permissions, accessing AWS Glue Studio is straightforward:
- Sign in to AWS Management Console – Navigate to the AWS Glue service under the “Analytics” category.
- Open AWS Glue Studio – Click “AWS Glue Studio” to access the interface.
- Start Creating ETL Jobs – Use the visual editor to design your first ETL workflow or modify existing ones.
If you’re wondering how to install AWS Glue Studio, there’s no separate installation required—it is a fully managed, cloud-based tool available directly in the AWS Console. For businesses asking how to connect AWS Glue Studio with other AWS services, the tool natively integrates with Amazon S3, RDS, and Redshift, making setting up data pipelines easier.
Creating an ETL Job in AWS Glue Studio
AWS Glue Studio makes creating ETL (Extract, Transform, Load) jobs easy without writing complex code. Using its visual editor, you can design workflows that connect to different data sources, transform raw data, and load it into a target system for further analysis. Below is a step-by-step guide to creating an ETL job using AWS Glue Studio.
Step 1: Navigating to the Visual ETL Editor
To create a visual ETL job in AWS Glue Studio, follow these steps:
1. Open AWS Glue Studio from the AWS Console.
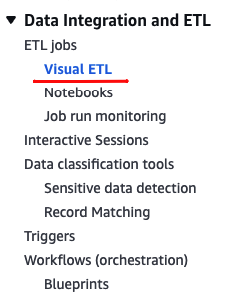
2. Select “Visual ETL” on the left sidebar and click “Create Job”.
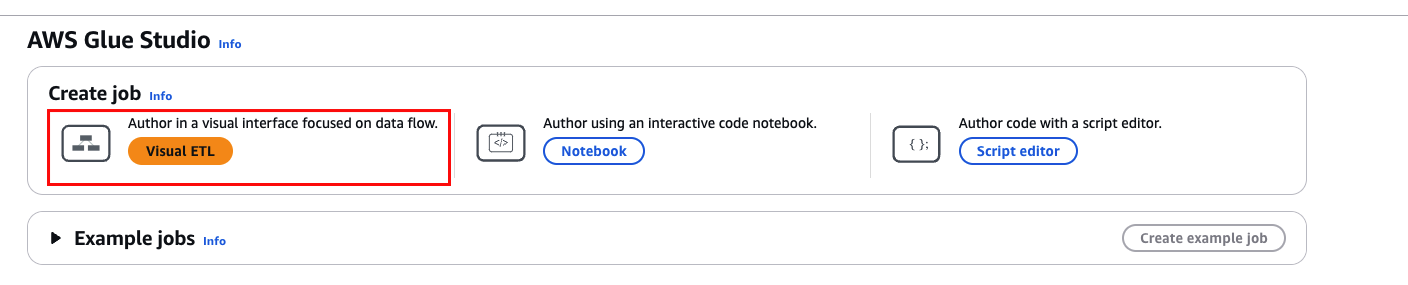
- This will open the drag-and-drop visual editor, where you can build ETL jobs without writing code.
Step 2: Connecting to Data Sources
The first step in any ETL job is defining the data sources. AWS Glue Studio allows you to pull data from multiple sources, including:
- Amazon S3 (unstructured data, CSV, JSON, Parquet)
- Amazon RDS (structured relational database storage)
- Amazon Redshift (data warehousing)
- Amazon DynamoDB (NoSQL database)
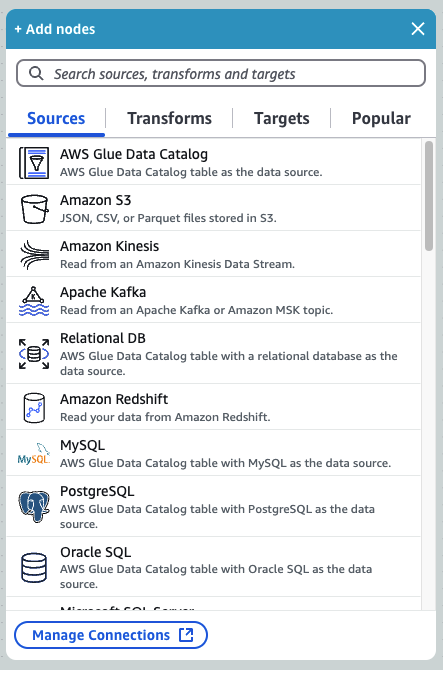
To connect AWS Glue Studio to a data source:
- In the visual ETL editor, click “Add a source.”
- Select the data source (S3, RDS, Redshift, DynamoDB, etc.).
- Configure connection details like database name, table, and authentication credentials.
Each data source appears as a node in the ETL workflow. You can select multiple sources, allowing AWS Glue Studio to merge and process data from different systems.
Step 3: Transforming Data
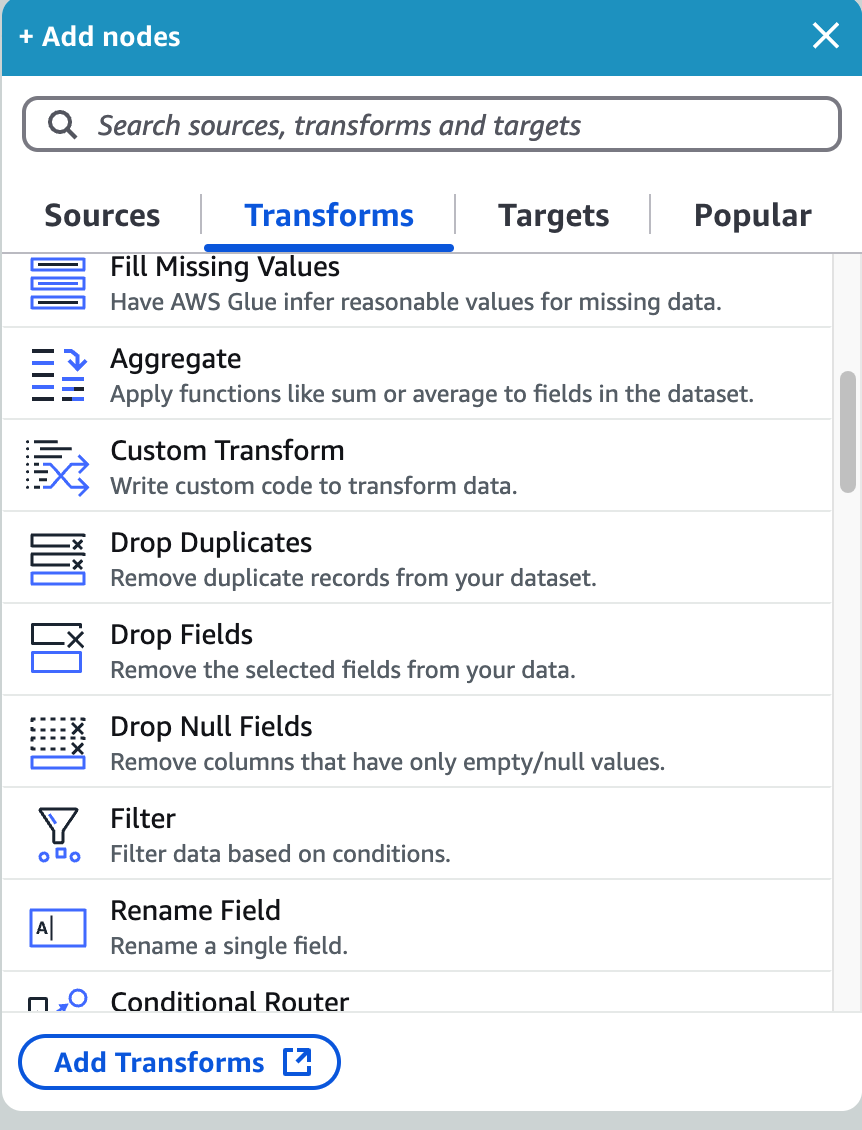
Once the data source is connected, the next step is transforming the data. AWS Glue Studio provides a range of built-in transformation options, including:
- Joining datasets – Combine data from different sources.
- Renaming columns – Modify field names to match the target schema.
- Filtering data – Remove unnecessary records.
- Aggregating values – Perform calculations like sum, average, and count.
To apply transformations:
- Click “Add a transform” in the visual editor.
- Choose the transformation type (join, filter, rename, aggregate).
- Configure transformation rules based on your requirements.
Step 4: Configuring Job Parameters
To optimize ETL performance, AWS Glue Studio allows you to configure job parameters such as:
- Memory allocation – Allocate sufficient memory for large datasets.
- Parallelism – Increase parallel execution for faster processing.
- Retries – Set retry attempts in case of failures.
These settings ensure efficient data processing while minimizing costs. According to AWS benchmarks, optimizing memory and parallelism can reduce ETL job runtime by up to 60%, making it a crucial step in job configuration.
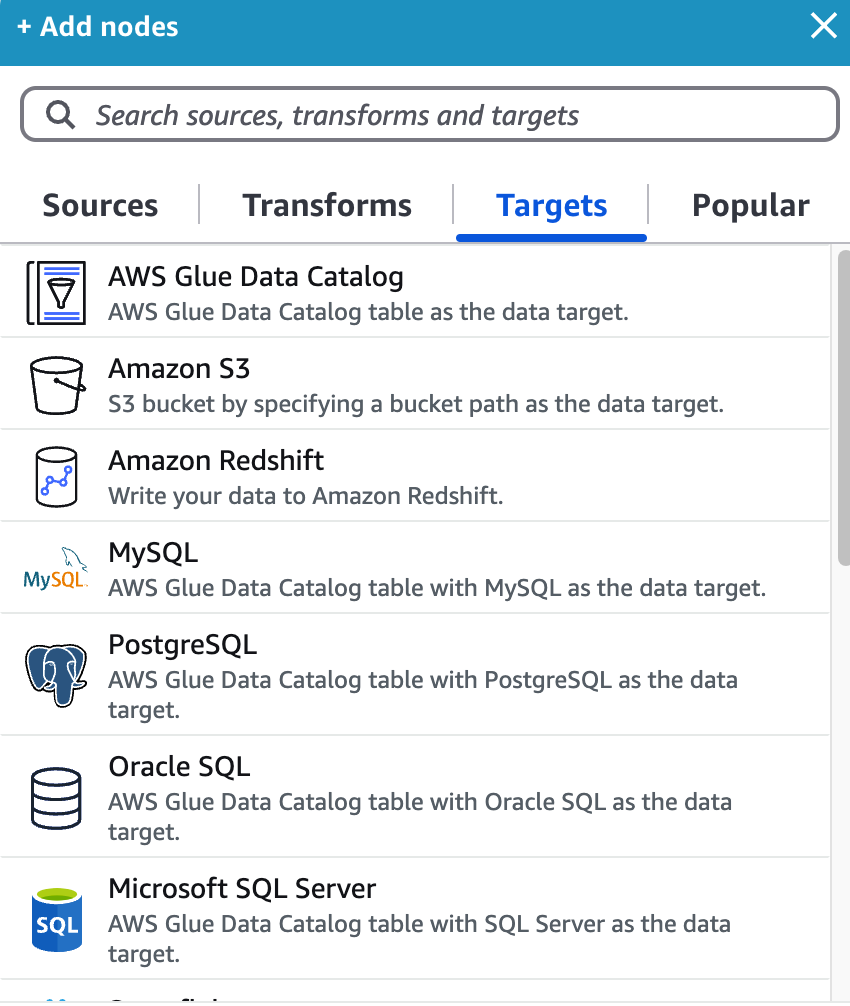
Step 5: Writing Transformed Data to a Target Destination
The final step is loading the transformed data into a target system. AWS Glue Studio supports multiple output destinations, including:
- Amazon S3 – Ideal for cost-effective storage (supports Parquet format for faster querying).
- Amazon Redshift – Best for structured data used in analytics.
- Relational Databases (RDS, MySQL, PostgreSQL) – Used for application backends.
- NoSQL Databases (DynamoDB) – Suitable for real-time applications.
To configure the target destination:
- Click “Add a target” in the visual editor.
- Select the destination (S3, Redshift, RDS, etc.).
- Define file format, compression settings, and partitioning strategy.
After finalizing the ETL workflow, click “Run AWS Glue Studio Job” to start the process. AWS Glue will automatically fetch, clean, and store your data in the specified target.
Transformations and Data Processing in AWS Glue Studio
Once data is extracted from its sources, the next step is transforming and processing it before loading it into a target destination. AWS Glue Studio simplifies this by offering a range of built-in transformation features that allow users to clean, structure, and enhance their data using an intuitive visual interface.
Why Data Transformation Matters?
Raw data is often messy, containing duplicate values, missing fields, or inconsistent formats. Transformation ensures data is structured, optimized, and ready for analysis, making it a crucial step in any AWS Glue Studio guide.
For businesses designing a scalable data integration architecture, these transformations play a vital role in ensuring data flows seamlessly between different systems while maintaining quality and consistency.
Types of Transformations in AWS Glue Studio
AWS Glue Studio provides several transformation options within the Visual ETL Job Editor. These include:
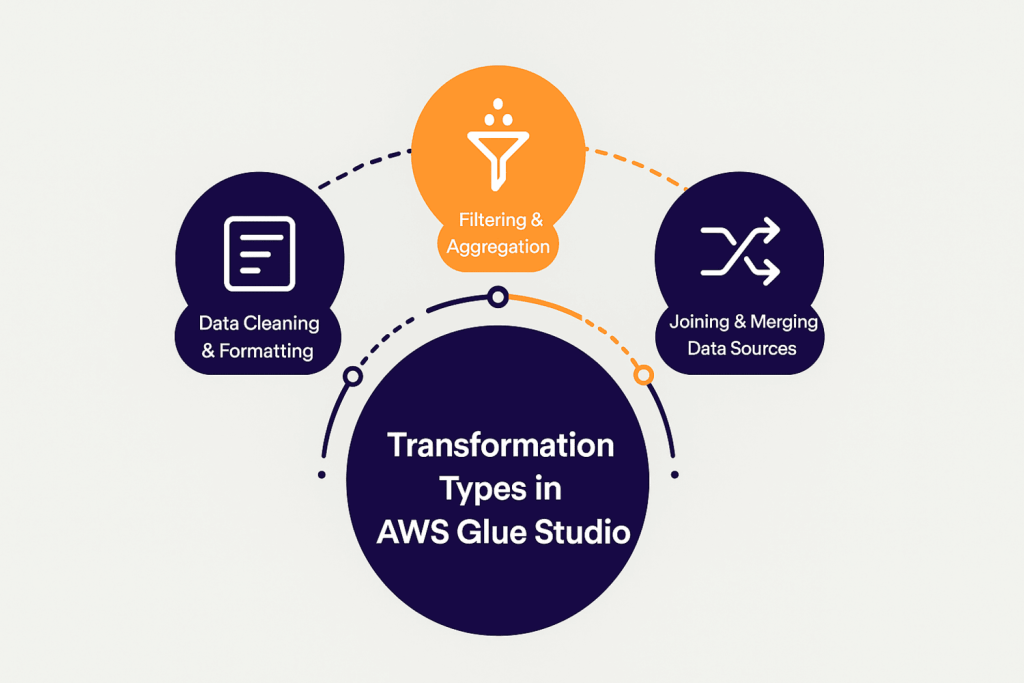
1. Data Cleaning and Formatting
- Column renaming – Standardizes column names for consistency.
- Data type conversions – Converts data types (e.g., string to integer).
- Handling missing values – Removes or fills missing data points.
2. Data Filtering and Aggregation
- Row filtering – Removes unwanted records based on conditions.
- Data aggregation – Performs calculations like sum, average, and count.
- Deduplication – Eliminates duplicate entries for accuracy.
3. Joining and Merging Data from Multiple Sources
AWS Glue Studio allows you to merge data from different sources, such as:
- Amazon S3 and Amazon RDS
- Amazon Redshift and DynamoDB
Combining datasets based on standard fields using join transformations creates a unified view for further analysis.
How to Apply Transformations in AWS Glue Studio?
- Open the Visual ETL Editor and add your data sources.
- Click “Add a Transform” to modify the data.
- Select the required transformation (join, filter, aggregate, etc.).
- Configure the transformation settings and apply changes.
For example, if you are working with customer sales data:
- Use join to merge customer details with sales transactions.
- Apply filters to exclude incomplete records.
- Perform aggregation to calculate total revenue per customer.
Optimizing Data Processing in AWS Glue Studio
AWS Glue Studio also provides advanced settings to optimize data processing:
- Parallel Processing – Uses multiple compute nodes for faster transformations.
- Partitioning – Divides data into smaller chunks for efficient querying.
- Compression – Reduces storage costs by using formats like Parquet and ORC.
Final Step – Writing Transformed Data to a Target
Once the data has been cleaned and processed, it can be stored in:
- Amazon S3 (optimized Parquet format for analytics).
- Amazon Redshift (structured data for reporting).
- DynamoDB (real-time applications).
Understanding AWS Glue Studio Targets
In any ETL process, the final destination where transformed data is loaded is just as important as the extraction and transformation stages. AWS Glue Studio provides a set of target destinations that allows you to store your processed data in a way optimized for querying, analytics, and further processing.
Understanding the available target options is key to efficiently using AWS Glue Studio for data integration tasks, especially for organizations leveraging data analytics in digital transformation initiatives.
What Are Targets in AWS Glue Studio?
In AWS Glue Studio, targets are where your transformed data is written after the processing stage. This step is crucial because it determines how and where the data will be accessed for future use, whether for analysis, reporting, or loading into other systems.
Common AWS Glue Studio Target Destinations
AWS Glue Studio allows you to write your transformed data using several storage and database options, making it flexible for different use cases. The most commonly used target destinations include:
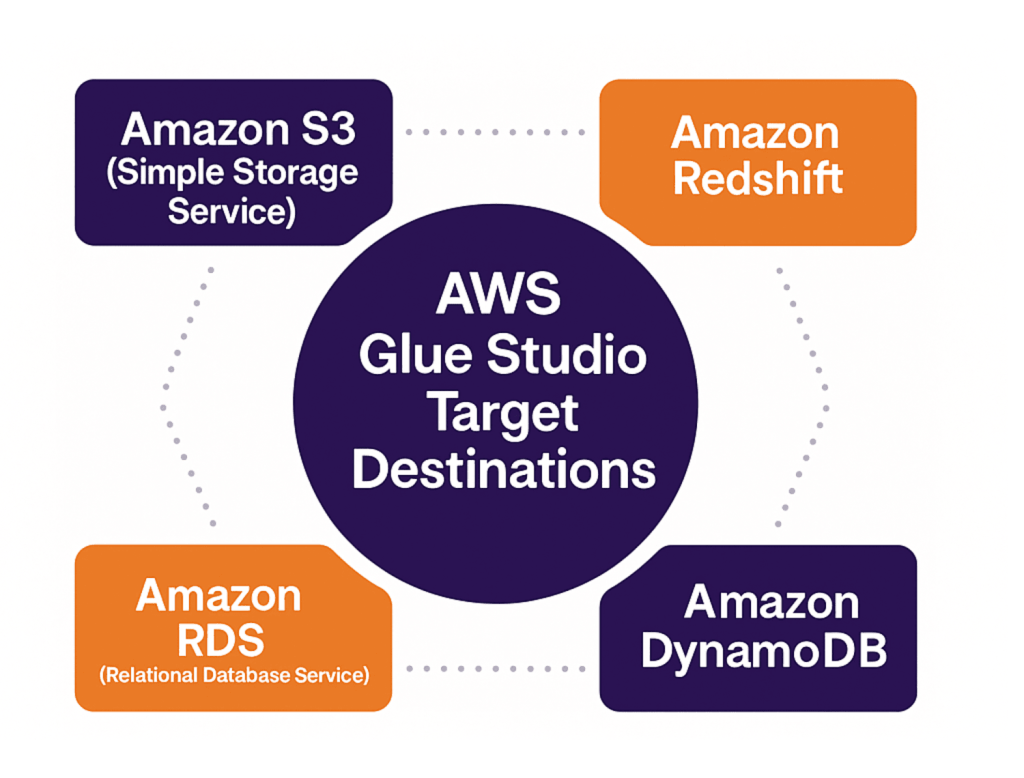
1. Amazon S3 (Simple Storage Service)
Amazon S3 is one of AWS Glue Studio’s most widely used target destinations. It’s a scalable storage solution where data can be saved in various formats such as CSV, Parquet, ORC, JSON, or Avro.
2. Amazon Redshift
Amazon Redshift is a fully managed data warehouse that simplifies complex queries on large datasets. It is ideal for businesses that need fast querying capabilities for structured data.
3. Amazon RDS (Relational Database Service)
Amazon RDS allows you to run relational databases in the cloud, such as MySQL, PostgreSQL, Oracle, and SQL Server. For applications that require structured data and complex transactions, RDS is a great target.
4. Amazon DynamoDB
Amazon DynamoDB is a fully managed NoSQL database service designed for applications that require high performance and scalability for key-value and document data models.
How to Set Up and Configure Targets in AWS Glue Studio?
To set up targets in AWS Glue Studio, follow these general steps:
1. Select the Target
After completing the transformations, go to the Targets tab in the AWS Glue Studio Visual Editor. Then, you can select a target destination from the available ones, such as Amazon S3, Redshift, RDS, or DynamoDB.
2. Configure the Target Settings
Each target has specific configurations you need to set, such as:
- For S3, specify the S3 bucket and choose the data format (Parquet, CSV, etc.).
- For Redshift or RDS, provide connection details like the cluster, database, and table names.
3. Validate and Run the Job
After configuring the target, validate the entire ETL pipeline, ensuring that data is correctly written to the selected destination. Applying data engineering expertise during this step helps optimize the ETL process and catch potential configuration issues. Finally, run the ETL job and monitor its progress.
Scheduling and Running AWS Glue Jobs
Once you’ve created and configured your ETL jobs in AWS Glue Studio, the next step is to schedule and run them for automated data processing. AWS Glue provides powerful tools to automate the execution of your jobs, ensuring they run at the right time and frequency without manual intervention. This is key for continuous data pipelines and efficient workflows.
Scheduling AWS Glue Jobs
AWS Glue offers the option to schedule jobs using Amazon CloudWatch Events. Scheduling jobs ensures that your ETL tasks run at specific times or intervals, whether daily, weekly, or based on a custom schedule.
How to Schedule Jobs?
- Go to the Schedule section after setting up your job in AWS Glue Studio.
- You can set the frequency and timing, such as cron expressions (for advanced scheduling), or use the simple schedule options for daily, weekly, or monthly runs.
- AWS Glue will automatically trigger the job based on the defined schedule, executing your ETL process without manual input.
Running AWS Glue Jobs
You can manually run AWS Glue jobs whenever needed directly from the AWS Glue Console or AWS Glue Studio. Running the job initiates the ETL process, which includes data extraction, transformation, and loading the data into the specified target.
How to Run a Job?
- Select the job you want to run in the AWS Glue Studio interface.
- Click the Run button to execute the job.
- You can also monitor job progress and review logs to ensure everything runs smoothly.
Job Monitoring and Logging
Once a job is running or completed, AWS Glue provides detailed logs and monitoring tools, allowing you to track the status of your ETL process. You can also use AWS CloudWatch to view logs and metrics and troubleshoot any issues during execution. This helps ensure that your data workflows are efficient and error-free.
Integration with Other AWS Services
AWS Glue Studio isn’t just a standalone tool; it’s designed to integrate with various other AWS services to enhance your data processing workflows and ensure a smooth, unified experience. This integration allows you to use the power of AWS’s broader ecosystem, from storage to analytics, and helps you build more efficient and scalable ETL pipelines.
By leveraging proven data integration techniques, AWS Glue ensures that data flows seamlessly between services without silos or bottlenecks.
1. Integration with Amazon S3
One of the primary integrations in AWS Glue Studio is with Amazon S3. AWS Glue can extract data from various sources and load it directly into S3 for storage. S3 is widely used because it offers scalable and cost-effective object storage. With AWS Glue, you can automate your data’s extraction, transformation, and loading (ETL) directly into S3, ready for future processing or analytics.
2. Integration with Amazon Redshift
AWS Glue Studio works best with Amazon Redshift, a fully managed data warehouse service. With this integration, you can automate the data extraction from different sources (such as S3 or RDS) and load it into Redshift for fast query processing and data analysis.
This seamless combination is especially valuable for businesses leveraging data analytics services and solutions, as it enables them to transform raw data into actionable insights at scale.
3. Integration with AWS RDS
AWS Glue Studio also connects with Amazon RDS (Relational Database Service), making performing ETL operations on relational data easy. Whether it’s MySQL, PostgreSQL, or SQL Server, AWS Glue allows you to integrate data from RDS, transform it, and store it in your preferred target, including databases or cloud storage services.
This ability is especially valuable for organizations adopting cloud data integration strategies, where data from on-premises and cloud-based relational systems needs to be unified seamlessly.
4. Integration with Amazon DynamoDB
Another powerful integration is with Amazon DynamoDB, a fast and flexible NoSQL database. AWS Glue Studio enables the extraction of data from DynamoDB, transforms it, and stores it in relational or analytical databases like Redshift or S3, depending on your needs.
5. Integration with Amazon CloudWatch
Amazon CloudWatch provides real-time monitoring of your AWS Glue jobs. Integrating AWS Glue with CloudWatch lets you track job performance, get notifications about job failures, and set alarms based on predefined thresholds. This ensures you’re always on top of your ETL jobs’ performance and can quickly address any issues.
6. Integration with AWS Lambda
AWS Glue Studio integrates with AWS Lambda to automate specific parts of your ETL workflows. Lambda functions can be triggered by AWS Glue jobs, allowing you to run custom processing or data validation logic during your ETL pipeline. AWS Glue Studio is a flexible and extensible tool for handling complex data workflows.
Many organizations rely on data integration consulting to design these automated pipelines effectively, ensuring smooth orchestration across services like Glue, Lambda, and CloudWatch.
7. Integration with Amazon QuickSight
AWS Glue Studio integrates well with Amazon QuickSight for data visualization and business intelligence. Once your data has been processed and loaded into a storage service like S3 or Redshift, QuickSight can generate visualizations and dashboards based on that data.
FAQs
How does AWS Glue Studio simplify ETL jobs?
AWS Glue Studio provides a visual editor to connect data sources, apply transformations, and load data into destinations like Amazon S3, Redshift, RDS, or DynamoDB. This automation minimizes manual scripting and accelerates data preparation.
What are the key features of AWS Glue Studio?
Key features include the AWS Glue Data Catalog for metadata management, Glue Crawlers for schema detection, automated ETL jobs, integration with AWS services (S3, Redshift, RDS, DynamoDB, CloudWatch), and a user-friendly visual interface.
How do you set up AWS Glue Studio?
To set up AWS Glue Studio, you need an AWS account, IAM roles with permissions (such as AWSGlueServiceRole and AmazonS3FullAccess), and access to the AWS Management Console. Once configured, you can launch Glue Studio directly without installation.
Can AWS Glue Studio connect to multiple data sources?
Yes, AWS Glue Studio connects to diverse sources including Amazon S3, Amazon RDS, Redshift, DynamoDB, and even on-premises databases. It can merge, clean, and transform structured, semi-structured, and unstructured data.
What are AWS Glue Crawlers and why are they important?
AWS Glue Crawlers automatically scan datasets, detect schema structures, and populate the Glue Data Catalog. This reduces manual effort in defining metadata and ensures data is easily discoverable across analytics tools like Athena and Redshift.
How does AWS Glue Studio handle data transformation?
AWS Glue Studio supports transformations such as filtering, joining, renaming, deduplication, aggregation, and data type conversion. These transformations ensure that raw data is cleaned, enriched, and optimized for analytics and machine learning.
What are the common target destinations in AWS Glue Studio?
AWS Glue Studio supports multiple targets including Amazon S3 (object storage), Amazon Redshift (data warehouse), Amazon RDS (relational databases), and DynamoDB (NoSQL database). This flexibility makes it suitable for analytics, reporting, and real-time applications.
How can you schedule and automate ETL jobs in AWS Glue Studio?
ETL jobs can be scheduled using Amazon CloudWatch Events. Users can define time intervals or cron expressions, enabling automated and recurring data processing without manual intervention.
Conclusion
AWS Glue Studio offers a powerful and user-friendly platform for automating and managing ETL workflows, enabling efficient data transformation and integration across various AWS services. From setting up the environment to creating and scheduling ETL jobs, it organizes data management tasks, making it an essential tool for data engineers and analysts.
For businesses looking to maximize the potential of AWS Glue and cloud data solutions, Folio3 provides expert services in cloud migration, ETL processes, and data management. Our team can help you use AWS Glue Studio and other AWS services to optimize your data workflows, ensuring scalability, efficiency, and integration with your business operations.